Recruitment Workflows
Contents
Recruitment Workflows and their Pivotal Role
Recruitment Workflows play an important role in how the recruitment process or steps in the recruitment process are carried out.
The recruitment workflow is flexible and allows for as many steps in a recruitment process as needed.
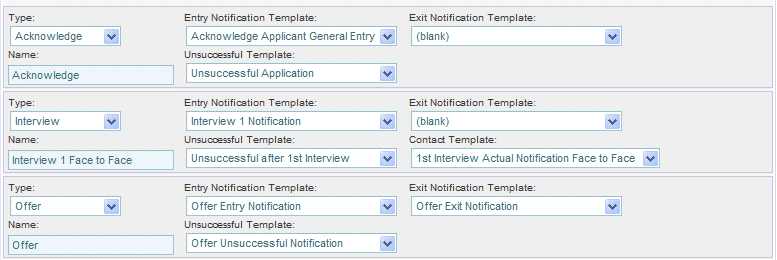
A standard 3 step process may look like this:
- Acknowledge the applicants interest.
- Interview the applicant.
- Make an offer.

Not all recruitment processes are as simple as that.
The Recruitment workflow defines what happens at each stage, as you can see from above in:
- Step 1 (Acknowledge) when the system receives an application it sends a General Applicant letter saying "Thank You, we have received your application."
If you decline the application the system knows to send the applicant the Unsuccessful Application letter.
If you progress the applicant to - Step 2 (Interview) the system knows to send notification of an Interview.
Setting up Recruitment Workflows
- After logging into Subscribe-HR, select the Maintenance TAB.
- Select the Recruitment Workflow folder.
- Select the 'Create' button.
- Enter a Workflow Name (This name should be appropriate to the recruitment process).
- Enter a Workflow Description.
- Select the Save button.
- After saving you now will see the Workflow Definition and an Add Step hyperlink.
- Select the Add Step hyperlink.
- Select the type of step this is from the Type drop down. (The Types are predefined in the system as Acknowledge, Interview, Reference Check and Offer.)
- Enter a name for this step in the Name text box.
- Select the Entry Notification Template (Further templates can be created by going to the Correspondence folder) If you do not want any correspondence sent out at this step then leave this as blank.
- Select the Unsuccessful Template.
- Select the Exit Notification Template.
- Select the Save button.
- Select the Add Step hyperlink to add the next step.
Please note: When adding Unsuccessful correspondence, you will ned to link using Applicant Vacancy Object, otherwise you will not be able to select the Template in the Unsuccessful drop down option.
Creating Additional Templates
Creating additional templates should be done before starting to create a workflow, to make the process a whole lot smoother.
- Select the Maintenance TAB.
- Select the Correspondence folder.
- Enter the Template name. This name should be something relevant to the letter you are creating.
- Select the relevant Object.
The Object must be on an Applicant or Applicant Vacancy to be seen in the Recruitment Workflow as a Template. - Select the Encoding type, this defines the type of symbols used within the document and how it may interpret your document.The Encoding of Western and Unicode is defined below.
- Enter the Subject of the Template, this is what will appear in the Subject Line: of the email.
- Select the Save button.
- You will be presented with the Merge Fields and text area.
- Write your letter, or paste your letter into the text area.
- Position your cursor in the text area where you require data.
- Select the desired Merge Field, you will see that the Merge Field is inserted between the words where you positioned your cursor.
- Once this is completed, select the Save button.
- Selecting the Send button will allow you to send a test letter. When you select the send button you are prompted to enter an email address.
Pasting a MS Word Document into the Correspondence text area
The Subscribe-HR Software comes with some great tools for formatting the text.
If however you have your standard correspondence letter already
designed in Microsoft Word you can simply copy from Microsoft Word and paste into the Description text field.
Sometimes there are formatting issues and not everything looks the same. In this instance click on the MS Word icon in the tool bar above the text area.
This will provide you with a window to paste your Microsoft Word text into
1. Copy MS Word Text.
2. Paste MS Word Text into Window.
3. Select the 'Insert' button.
ENCODING TYPE: Western (ISO 8859-1)
ISO/IEC 8859-1:1998, Information technology — 8-bit single-byte coded graphic character sets — Part 1: Latin alphabet No. 1, is part of the ISO/IEC 8859 series of ASCII-based standard character encodings, first edition published in 1987. It is informally referred to as Latin-1. It is generally intended for “Western European” language.
ENCODING TYPE: Unicode (UTF-8)
UTF-8 (8-bit UCS/Unicode Transformation Format) is a variable-length character encoding for Unicode. It is able to represent any character in the Unicode standard, yet is backwards compatible with ASCII. For these reasons, it is steadily becoming the preferred encoding for e-mail, web pages,[1][2] and other places where characters are stored or streamed.