Modifying Reports and Filtering
| Line 17: | Line 17: | ||
<br> | <br> | ||
# After logging into the Subscribe-HR either select Tools > Reports > ‘Standard’ or ‘My Reports’ SubTabs, <br>Or select '''List Reports.''' on the '''Quick Link Bar'''. <br>[[File:Report-ListReport.jpg]] | # After logging into the Subscribe-HR either select Tools > Reports > ‘Standard’ or ‘My Reports’ SubTabs, <br>Or select '''List Reports.''' on the '''Quick Link Bar'''. <br>[[File:Report-ListReport.jpg]] | ||
| + | # Select the area the Report is in. This will be one of the following SubTabs: '''Standard''', '''My Reports''', '''Shared With Me''' and '''Custom'''. <br>Each TAB is explained below. | ||
# Select the Report you wish to modify. | # Select the Report you wish to modify. | ||
| − | # You will see 3 or 4 SubTabs: | + | # You will see 3 or 4 SubTabs: General, Join Tables (if option selected), Fields and View Report. <br>Each TAB is explained further below. |
| + | |||
| + | |||
| + | ===Report Groupings=== | ||
| + | All the Reports are grouped into the following 4 areas: | ||
| + | |||
| + | ====Standard SubTab==== | ||
| + | This is a list of all the Standard Reports in the Subscribe-HR System. | ||
| + | They can be modified or deleted as required. | ||
| + | [[File:Report-Standard1.jpg]] | ||
| + | . . . | ||
| + | [[File:Report-Standard2.jpg]] | ||
| + | |||
| + | ====My Reports SubTab==== | ||
| + | This is a list of all the Reports created by the User. | ||
| + | [[File:Report-MyReports.jpg]] | ||
| + | |||
| + | ====Share With Me SubTab==== | ||
| + | This is a list of all the Standard Reports, My Reports & any other reports created by other users & marked as '''Public'''. | ||
| + | [[File:Report-SharedWithMe1.jpg]] | ||
| + | . . . | ||
| + | [[File:Report-SharedWithMe2.jpg]] | ||
| + | |||
| + | ====Custom SubTab==== | ||
| + | This is a link to the Custom Reports which have been created by Subscribe-HR for the client. | ||
| + | |||
| + | |||
| + | |||
| + | |||
| + | |||
| + | |||
| + | |||
===General=== | ===General=== | ||
| − | # Select the General | + | # Select the General SubTab. |
| − | # Select the '''Public''' check box<br>By selecting the Public check box you are making this report available to all users.<br>By removing the check from the Public check box you are making this report private and only available to users with permissions. | + | # Select the '''Public''' check box. <br>By selecting the Public check box you are making this report available to all users. <br>By removing the check from the Public check box you are making this report private and only available to users with permissions. |
| + | # Select the '''Report Type''' from the dropdown, such as ‘Human Resources’, ‘Recruitment’, etc. | ||
# Enter '''Report name'''. The name of the report should be descriptive in what data it shows. | # Enter '''Report name'''. The name of the report should be descriptive in what data it shows. | ||
# '''Object''' is not changeable when modifying a report. The Object defines what Tables and Fields are available for your report. | # '''Object''' is not changeable when modifying a report. The Object defines what Tables and Fields are available for your report. | ||
| + | # '''Join Tables (Advanced)''' is not changeable when modifying a report. | ||
# '''Display Empty Records''' is where you can specify to make all entries in an object to sub-object relationship to be displayed even if the entries in the object does not have an entry in the sub-object. | # '''Display Empty Records''' is where you can specify to make all entries in an object to sub-object relationship to be displayed even if the entries in the object does not have an entry in the sub-object. | ||
# '''Report Description''' is where you can make notes on the report and describe the data it shows. | # '''Report Description''' is where you can make notes on the report and describe the data it shows. | ||
| + | # Enable the '''Report Scheduler''' if required. <br>If Report Scheduler is selected, then you will get the following options: | ||
| + | # Select the '''Format''' you want the report delivered in | ||
| + | # Select the '''Frequency''' you would like to send report | ||
| + | # Select the '''Recipients''' by selecting the user | ||
| + | [[File:???]] | ||
| + | |||
| + | |||
===Fields=== | ===Fields=== | ||
| Line 48: | Line 89: | ||
The '''Sorting''' column is populated with a drop down for all fields.<br>[[File:sort.gif]]<br>Selecting the sort order of '''Descending''' for a field will cause the report to output the data in descending order highest to lowest. | The '''Sorting''' column is populated with a drop down for all fields.<br>[[File:sort.gif]]<br>Selecting the sort order of '''Descending''' for a field will cause the report to output the data in descending order highest to lowest. | ||
| − | ===Condition=== | + | ====Condition==== |
Conditions are used to filter your report based on a criteria. | Conditions are used to filter your report based on a criteria. | ||
Example: You have created a report that lists all employees names, age and its grouped by department, but you only want to see data for 2x locations. | Example: You have created a report that lists all employees names, age and its grouped by department, but you only want to see data for 2x locations. | ||
Revision as of 03:44, 24 January 2013
<<< Currently Under Construction for Report Writer Modifications >>>
Contents
Modifying Human Resources Reports
The Subscribe-HR Software system is Object orientated and this is the same for Reports.
The ability to add particular fields into a report solely relies on that field being part of the object.
Example: We are modifying the Employee Details report, which belongs to the Employee Object.
The Database Tables and Fields that are available to me are limited to anything in the Employee Object and this would include Employee, Employee Medical, Employee Property and so on.
We would not be able to add any fields from the Jobs Table because Jobs is its own Object. We can however add fields from the Employee Jobs Table.
- After logging into the Subscribe-HR either select Tools > Reports > ‘Standard’ or ‘My Reports’ SubTabs,
Or select List Reports. on the Quick Link Bar.
- Select the area the Report is in. This will be one of the following SubTabs: Standard, My Reports, Shared With Me and Custom.
Each TAB is explained below. - Select the Report you wish to modify.
- You will see 3 or 4 SubTabs: General, Join Tables (if option selected), Fields and View Report.
Each TAB is explained further below.

Report Groupings
All the Reports are grouped into the following 4 areas:
Standard SubTab
This is a list of all the Standard Reports in the Subscribe-HR System.
They can be modified or deleted as required.
 . . .
. . .

My Reports SubTab
This is a list of all the Reports created by the User.

This is a list of all the Standard Reports, My Reports & any other reports created by other users & marked as Public.
 . . .
. . .

Custom SubTab
This is a link to the Custom Reports which have been created by Subscribe-HR for the client.
General
- Select the General SubTab.
- Select the Public check box.
By selecting the Public check box you are making this report available to all users.
By removing the check from the Public check box you are making this report private and only available to users with permissions. - Select the Report Type from the dropdown, such as ‘Human Resources’, ‘Recruitment’, etc.
- Enter Report name. The name of the report should be descriptive in what data it shows.
- Object is not changeable when modifying a report. The Object defines what Tables and Fields are available for your report.
- Join Tables (Advanced) is not changeable when modifying a report.
- Display Empty Records is where you can specify to make all entries in an object to sub-object relationship to be displayed even if the entries in the object does not have an entry in the sub-object.
- Report Description is where you can make notes on the report and describe the data it shows.
- Enable the Report Scheduler if required.
If Report Scheduler is selected, then you will get the following options: - Select the Format you want the report delivered in
- Select the Frequency you would like to send report
- Select the Recipients by selecting the user
Fields
- Select the Fields TAB
- You should see a Report Object drop down. In the drop down are all the Tables that are available under this Object.

- On the left is a list of all Fields available from the selected Table in the Report Object drop down.
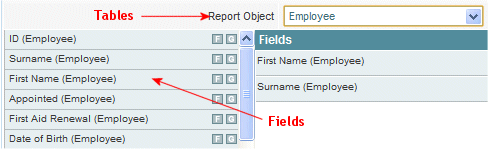

- In the centre of the screen you should see 2x headings Fields and Groups
The fields that appear under the Fields heading are fields that you are showing on your report.
Example: If I wanted to add Employee Age to my report I would expect to see First name, Surname and Age under the fields heading.
- The Groups heading allows for a Group By function, where by adding a field under the Groups heading would cause all fields to show on the report and be in groups by the field that appears under the Groups heading.
Example: If we added a field such as Department under the Groups heading our report would show All Employees First Name, Surname and Age, and this would be Grouped in departments.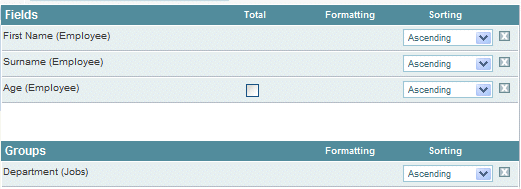
Example Report: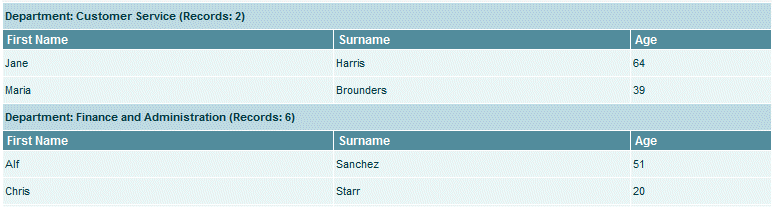
- To add a field under the Fields heading select the
 next to the desired field.
To add a field under the Groups heading select the next to the desired field.
To remove a field select the next to the desired field.
- Select the Save button.


Total
The Total column is populated with a check box when a numeric field is added.![]()
If the check box is selected this will provide a total of all numeric values at the bottom of the report, if the report is grouped by the total is placed at the bottom of each grouping.
Formatting
The Formatting column is populated with a drop down when a date field is added![]()
If formatting is selected such as Month Name this will only display the Month name in the report and not the dd/mm/yyyy
Sorting
The Sorting column is populated with a drop down for all fields.![]()
Selecting the sort order of Descending for a field will cause the report to output the data in descending order highest to lowest.
Condition
Conditions are used to filter your report based on a criteria. Example: You have created a report that lists all employees names, age and its grouped by department, but you only want to see data for 2x locations.
- Select the Condition TAB.
- We will see Add condition drop down.
- Select the field you wish to filter by.
- Select the filter type. The filter type varies depending on what field you are filtering on.
The most common are Equals To, Not Equals To, Is Last, This Last, Is Next - Select or Enter the value you are filtering on.
- Select the Save button.
Example: Filtering on selected Job Locations.

View Report
The View Report TAB allows us to generate and view the report. We can export to PDF or Excel file formats.
Only reports that are 'Grouped by can generate a Graph, otherwise a plain table of results will be generated.
- Select the View Report TAB.
Graph Types
The Graph type option will not be shown if a report has not been Grouped by. Selecting a Graph type will change the graph drawn on the report.
Export Options
Selecting an export option and then selecting the Export link will cause the report to be exported into the chosen format.
Do Not Export Graph
Selecting this checkbox will cause the graph to be excluded when exporting the report to the chosen format.
![]()