Importing Data into an Object
| Line 68: | Line 68: | ||
# Select the Object that you wish to import your data into<br>'''Example:''' If you are importing into the Employee File then select the Employee Object.<br><br>If you are importing into the Employee Bank Details file Select the Employee Object, select the Employee that you importing data for and then select the Employee Bank Details object. | # Select the Object that you wish to import your data into<br>'''Example:''' If you are importing into the Employee File then select the Employee Object.<br><br>If you are importing into the Employee Bank Details file Select the Employee Object, select the Employee that you importing data for and then select the Employee Bank Details object. | ||
# Select the '''import''' button<br>[[File:import_csv.gif]] | # Select the '''import''' button<br>[[File:import_csv.gif]] | ||
| − | # Select the data file you wish to import | + | # Select the data file you wish to import, by selecting the '''Choose File''' button. |
| − | # Select the Delimiter | + | # Select the Delimiter.<br>If you importing a csv file this is comma delimited<br>There are other format options such as Space delimited and TAB delimted that are available at the time of saving your data file. The format that you save your data file in must match the delimiter you select before import. |
| − | + | # | |
| − | + | ||
| − | + | ||
<br> | <br> | ||
[[File:subscribehr_logo.gif]] | [[File:subscribehr_logo.gif]] | ||
Revision as of 07:46, 12 July 2010
Contents
Importing Data into a Single Object
While it is preferred that data is entered through the Subscribe-HR Interface, importing of data
especially while getting setup can save time and helps make the experience of getting up and running a whole lot more smoother if done right.
There are a few very important steps that should be taken before even considering clicking the import button:
- Know what area of data you wish to import into, and pay attention to mandatory fields in the Subscribe-HR System.
- Ensure that the data you are importing is clean.
By this we mean that each record that is imported should be the correct information. The formatting of date fields, drop down fields, and text fields need to be correct. Mandatory fields must have data available. By taking extra time now to ensure what you are importing is clean will save you time later on. - Backup your database.
- Check your data again before import
- Import your data
Knowing what fields I can import data into
There are 2x types of data import available in the Subscribe-HR system.
- Single Object Import
- Multiple Object Import
In this article we are focusing on single object imports. Any field that appears on a screen in Subscribe-HR that you could normally enter data and save through the Interface can have data imported.
There is an exception for Photos and Document Uploads where these will need to be performed on an adhoc basis.
For Example: If you select the Object Employee you will be able to import data such as the Title, First Name, Middle Name. But Photo and Attachments will need to be added after the import.
The correct formatting of fields
It is extremely important that the fields in your import data file are of the correct formatting, if this is not done correctly your data may fail to be imported, or worse it may be imported and cause errors in the Subscribe-HR System.
Formatting of Date Fields
The format of the date field should match the Default Date Format of the logged in person. This is found in My Profile Details
- After logging into Subscribe-HR select My Profile

Selecting the Excel format for the field

Formatting of Drop Downs
When importing data related to drop downs the data should either match the code or the code name that appears in the drop down. The values are not case sensitive so in the example of Title, where the code is mr and the code name is Mr it would not really matter if we entered MR
There are some drop downs that exist in the system where the code may not necessarily match the code name and this is worth checking if you are unsure.
A good example of this:


Dealing with formatted text and using the text qualifier
At some point there is a possibility that we may come across a name with an apostrophe or an address written with a comma (such as Unit 52, Brougham Street)
If we were to import Address Line 1 as Unit 52, Brougham Street the comma tells the system that anything after the comma belongs in the next field which is not our desired outcome.
To combat such an issue when importing we should set the Text Qualifier.
The Text Qualifier has available options of ' " and none If we select the Text Qualifier as " and then import the data "Unit 52, Brougham Street" We will safely import the text as is as long as it is between the qualifier " "
Importing your data
- Select the Object that you wish to import your data into
Example: If you are importing into the Employee File then select the Employee Object.
If you are importing into the Employee Bank Details file Select the Employee Object, select the Employee that you importing data for and then select the Employee Bank Details object. - Select the import button
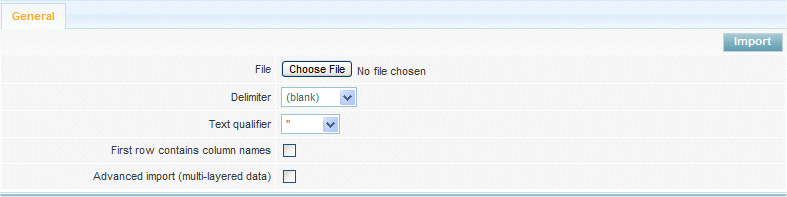
- Select the data file you wish to import, by selecting the Choose File button.
- Select the Delimiter.
If you importing a csv file this is comma delimited
There are other format options such as Space delimited and TAB delimted that are available at the time of saving your data file. The format that you save your data file in must match the delimiter you select before import.

![]()