Security Permissions
| Line 65: | Line 65: | ||
<br><br> | <br><br> | ||
[[File:Flicker_Highlight.jpg.png]] | [[File:Flicker_Highlight.jpg.png]] | ||
| − | + | <br><br> | |
| + | The above images show the Group Flicker that allows users to seamlessly move between groups if they have multiple Groups assigned to them. | ||
===Group Filtering=== | ===Group Filtering=== | ||
Revision as of 02:25, 25 January 2012
Contents
Security Groups
Subscribe-HR comes with 5 Security Groups already defined to get you started. These Security Settings are:
- System Administrator
- Developers
- Employee Self-Service
- Line-Manager Self-Service
- Directors and Executive Management
Please note that if there are multiple Security Groups assigned to a User, they will be able to Flick between these groups using a Function, located on the top left of the user interface.
Please also see Multiple Security Groups Assigned to a User:
http://www.subscribe-hr.com.au/wiki/Adding-users/#Multiple_Security_Groups_Assigned_to_a_User
If you cannot see the Maintenance TAB or the Groups menu item you may not have the correct permissions to perform Security Group changes.
Locating and Editing Security Groups
- After logging into Subscribe-HR, select the Maintenance TAB.
- Select the 'Groups' Folder.
- You should see a list of Group Names. These are the existing Security Groups.
- Select the 'Edit Permissions' hyperlink adjacent to Security Group you wish to modify.

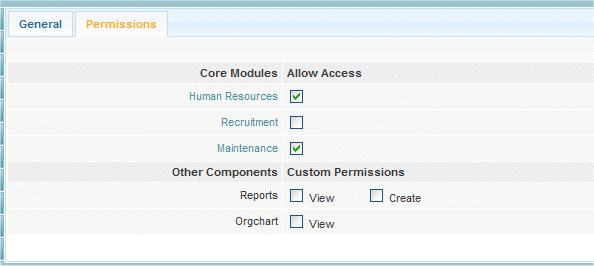
- You should see a Core Modules column and an Allow Access column.
- A tick in the Allow Access column adjacent to a Core Module means that this Security Group has access to these features in the system.
- Select one of the Core Modules.
- You will see a table with the folders down the page and allowable permissions across the page.
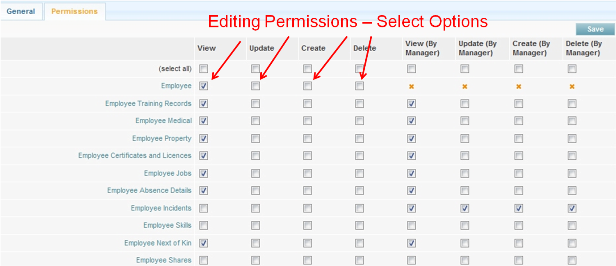
- If you wish to change the access on an entire folder simply check or remove the check in the appropriate column adjacent to the folder.
Example: Removing a check from the Delete column adjacent to the Employee folder will cause any user that has this Security Group singularly assigned to not be able to delete Employee's.
If you wish to change the access at a page level, (allow or remove access to someone Viewing or Editing a field) select the folder and this will drill you down to the next level.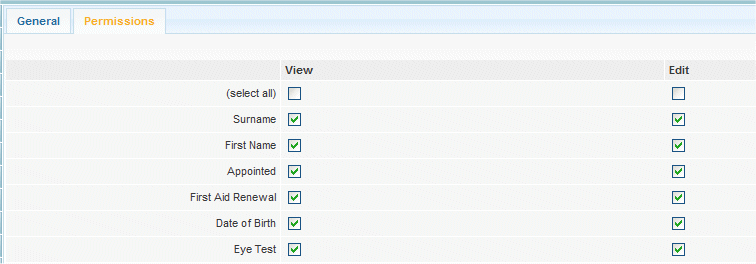
- If you are making modifications to the Folder level ensure you select the 'Save' button before drilling to a deeper level.


What Security Groups are assigned to a particular user
- Select the Maintenance TAB.
- Select the Users Folder.
- Select the user.
- Locate the Security Group options box, any checks in this options box mean that this user has the selected Security Group assigned to them.
Security Groups Explained
All users are assigned to one or more Security Groups. Security Groups define the users permissions within the system (this is what data the user can see and what functions and access the user has over changing the data).
User permissions can be set for View, Update, Create and Delete. The additional options are: View (By Manager), Update (By Manager), Create (By Manager), Delete (By Manager). These options relate to how the manager can interact with their teams records. The Orange X's signify that the settings and standard (Hard Coded) to ensure that Employee and Manager interaction can be perform easily and logically.
To Select the Option that you wish to assign to the Group, Click the Checkbox associated to the option required: e.g. Employee Training Records (View, Update). Employee (View). Employee Property (View). Once finished, click save.
Adding New Group
- Select the Maintenance TAB.
- Select Groups.
- Select the Create button.
- Enter the Group Name.
- Record if the Group is a Self-Service Group.
- Click Save.
- Click Groups.
- Select the Group you have just Created.
- Click Permissions.
- Select "Human Resources" for example
- Configure the Groups Setting by Selecting the Objects and the Object Options that are to be set-up: e.g. Employee (Update). Employee Medical (Update and View).
- Click "Save" to save the settings.
Multiple Security Groups Assigned to a User
Multiple Security Groups can be assigned to users. If multiple Groups have been assigned to a user, they can flick between these Groups by using the "Change Identity" or "Group Flicker" function located at the top left of the user interface. By assigning multiple Groups to a User, you can allow them to work using these diffent roles e.g. System Administrator and Self Service, or System Administrator and Payroll Manager. You can also use this function to test different Users Groups to see if they are set-up as per requirements prior to launch, to save you from having to login and out under different accounts.


The above images show the Group Flicker that allows users to seamlessly move between groups if they have multiple Groups assigned to them.
Group Filtering
Group Filtering can be set-up to allow specific users to interact with areas of the system according to specific filters, which interact with their overall Security Group. For example, You can set-up a Filter that applies to an an Interview Panel which has been assigned to a Vacancy. So that any of the Interview Panel, can view the Applicants for that Particular Vacancy.
- Select the "Groups" Folder in "Maintenance"
- Select a Specific Group
- Select the "Filtering" Sub Folder
- Click "Create"
- Mark "Active" as "Yes"
- Select the "Object" that the Filter Applies to. In the Example above this will be the "Vacancies" Object
- Click "Save"
- Then you will have access to the "Conditions" that can be set-up
- Select "Condition" "Default Interview Panel (Vacancies)" - "Equals To" - "Logged In User".
- Click "Save"

See Also Adding Security Groups: http://www.subscribe-hr.com.au/wiki/Adding-groups/
![]()