Creating New Vacancies
Contents
- 1 Vacancies
- 1.1 Creating new vacancies and publishing them on the online portal
- 1.1.1 Creating a vacancy
- 1.1.2 Vacancy Fields Explained
- 1.1.3 Assigning a Recruitment Workflow
- 1.1.4 Assigning a Hiring manager
- 1.1.5 Adding a recruiter
- 1.1.6 Making an employee a manager
- 1.1.7 Selecting a default Interview Panel
- 1.1.8 The Description field and using a Word Document
- 1.1.9 Assigning Questions
- 1.1.10 Publishing
- 1.2 Using Campaigns
- 1.1 Creating new vacancies and publishing them on the online portal
< < < UNDER CONSTRUCTION > > >
Vacancies
Creating new vacancies and publishing them on the online portal
When a user creates a new vacancy this can be published and made available for people to view and apply from different outlets.
These can be the Intranet, Online Portal, or an External Partner such as Seek or MyCareer.
The Online Portal refers to being published to the Public in such that this may appear on your own company site, or hosted for you.
People browsing your website may apply through the Online Portal. If placing advertisements for the vacancy the link to the Online Portal can be provided.
The Intranet refers to being published Internally in such that this vacancy appears for your employees on internal accessible site.
Creating a vacancy
See Creating a Vacancy.
Vacancy Fields Explained
Assigning a Recruitment Workflow
See Assigning a Recruitment Workflow.
Assigning a Hiring manager
See Assigning a Hiring Manager.
Adding a recruiter
- After logging into the Subscribe-HR portal, select the Recruitment TAB.
- Select the Contacts / Recruiters Folder.
- Select the [Create] button.
- Select the Type this person is. Example: Manager, Employee or Agency.
- Enter any particulars that are required and select the [Save] button.
Making an employee a manager
- After logging into the Subscribe-HR portal, select the Human Resources TAB.
- Select the Employees Folder.
- Select the Employee you wish to make a Manager.
- Locate a drop down called Manager and select Yes.
- If this Employee reports to another Manager, locate the Manager Reference drop down and select the Manager this Employee reports too.
- Select the [Save] button.
Selecting a default Interview Panel
See Selecting a Default Interview Panel.
The Description field and using a Word Document
See The Description field and using a Word Document.
Assigning Questions
See Assigning Questions.
Publishing
Publication Types
| Online Portal | Online Portal refers to the vacancy being published to the Online Portal. The Online Portal is in the public domain and maybe integrated into your website. People browsing your website may apply for this vacancy. |
| Internal Vacancy (Intranet) | Internal Vacancy refers to the vacancy being published on the dashboard of the self service tool. This means any staff who access the self service tool will be able to apply for this vacancy. Please note, if you are only using the Recruitment Modules, you can copy and past the URL that is available in the publication page, when you select "Intranet" and send this to employees. This will allow them to apply for the Vacancy via the Employee Portal area. |
| SEEK.com.au | SEEK.com.au refers to the vacancy being published on the SEEK website. Fee's and Charges may apply. Please see the article Publishing vacancies to Job Notice Boards for more information. |
| MyCareer.com.au | MyCareer.com.au refers to the vacancy being published on the MyCareer website. Fee's and Charges may apply. Please see the article Publishing vacancies to Job Notice Boards for more information. |
| CareerOne.com.au | CareerOne.com.au refers to the vacancy being published on the CareerOne website. Fee's and Charges may apply. Please see the article Publishing vacancies to Job Notice Boards for more information. |
Publishing to the Online Portal
- After the Vacancy has been Created and Activated, select the Publications SubFolder.
- If you see entries on the Publications screen, then this Vacancy has already been published for the Dates shown.
- Otherwise, Select the [Create] button.
- Select if this publication is going to be active by selecting Yes from the Active drop down.
- Select the Publication Type of Online Portal.
- Select the From Date. The vacancy will not appear on the Online Portal until this day.
- Select the To Date if known. The To Date will default to 1 month from the From Date if no value is entered.
- Otherwise select the Never Close check box (the To Date will disappear) if there is to be no end date.
- Select [Save] button when done.
- Check your Online Portal to make sure your Vacancy has published the way you expected it to.
If you are unsure of what the link is:
- Select the Maintenance TAB
- Select the Online Portal Settings Folder.
- Copy the link in the Portal URL text box and paste this into your browser address bar.
- Select the Maintenance TAB
If you publish to a third party jobs notice board such as SEEK or MyCareer then your vacancy is automatically published on the Online Portal for you.
Publishing an Internal Vacancy (Intranet)
- After the Vacancy has been Created and Activated, select the Publications SubFolder.
- If you see entries on the Publications screen, then this Vacancy has already been published for the Dates shown.
- Otherwise, Select the [Create] button.
- Select if this publication is going to be active by selecting Yes from the Active drop down.
- Select the Publication Type of Internal Vacancy (Intranet).
- Select the From Date. The vacancy will not appear on the Online Portal until this day.
- Select the To Date if known. The To Date will default to 1 month from the From Date if no value is entered.
- Otherwise select the Never Close check box (the To Date will disappear) if there is to be no end date.
- Select [Save] button when done.
- Check your Intranet to make sure your Vacancy has published the way you expected it to.
To locate and the Job Listing on the Intranet, select the Human Resources TAB, and select View Internal Vacancies from the Quick Links Dashboard panel.
Publishing to an External Third Party
Such as SEEK, MyCareer, CareerOne, etc.
- After the Vacancy has been Created and Activated, select the Publications SubFolder.
- If you see entries on the Publications screen, then this Vacancy has already been published for the Dates shown.
- Otherwise, Select the [Create] button.
- Select if this publication is going to be active by selecting Yes from the Active drop down.
- Select the External Publication Type of SEEK.com.au, MyCareer.com.au, CareerOne.com.au, etc.
- Depending upon the External Publisher selected, there will be a series of fields to populate. These will include fields like From Date, a Template, Location details, Salary, etc. Below is more details of these fields.
- Select [Save] button when done.
- Check the External Third Party Website to see if it has Published correctly.
Note: There could be a delay between Publication & Appearance on the site due to the External Third Party Publishing process.
Publishing to SEEK.com.au
- After the Vacancy has been created and activated select the Publications sub-folder.
- If you see entries in the Publications table then this vacancy has already been published.
- Select the Create button.
- Select the Publication Type as SEEK.com.au
- Select the From Date from the calendar.
The From Date will determine when the vacancy is published on SEEK.com.au - Select the SEEK Standard Ad Template from the drop down.
The Standard Template designs are available from the SEEK website. - Select the SEEK Zone from the drop down.
The SEEK Zone allows posting of vacancies into the General SEEK area or for executive vacancies select SEEK Executive. - Select the SEEK Classification from the drop down.
This is the vacancy category. - Select the SEEK Sub-Classification from the drop down.
This is the vacancy subcategory and is dependent on the Classification selected. - Select the SEEK Skills that apply to this vacancy.
You can select multiple items from the SEEK Skills by holding down the CTRL key and selecting a skill. - Select the SEEK Location.
This is the location of where the vacancy exists. - Select the SEEK Location Area.
This is the state area where the vacancy exists and is dependent on the Location. - Select the SEEK Work Type.
This is whether the vacancy is Full Time, Part Time, Contract/Temp, Casual/Vacation type work. - Select the Add Residents Only Message if you wish for the vacancy to appear on SEEK with a note advising that the vacancy is only available for residents of this country.
- Select the Pay Structure from the drop down.
- Select the Salary Min from the drop down if known.
This is the starting salary for this vacancy.
This value is not visble on SEEK however is used when searching for vacancies within a salary range. - Select the Salary Max from the drop down if known.
This is the highest salary available for this vacancy.
This value is not visible on SEEK however is used when searching for vacancies within a salary range. - Enter the salary into the Visible Salary if applicable.
- Enter the Search Results Title.
- Enter a short description of the vacancy into the Short Description area.
- Enter the Job Title.
This is the title of your vacancy advertisement.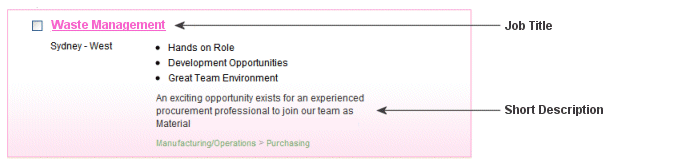
- Select the Make Your Ad Stand Out option if you wish to utilise SEEK priority feature.
- Select the Save button.
By clicking save you are publishing this vacancy on SEEK.

Using Campaigns
Setting up campaigns in the Subscribe-HR Software can allow a user to report on and gauge how successful a recruitment campaign was. This however is not necessary to setup to be able to publish a vacancy.
1. Select the Recruitment TAB and select the Campaigns folder.
2. Select the 'create' button.
3. Enter the Name of the Campaign.
4. Provide a Start date for the Campaign.
5. Provide an End Date for the Campaign if known.
6. Select a manager for the Campaign if applicable.
7. Select the location that the Campaign is for.
8. Enter any notes.
9. Select the 'Save' button.
Assigning a vacancy to a campaign
1. Select the Recruitment TAB.
2. Select the Vacancy folder.
3. Select the Vacancy you wish to assign.
4. Locate the 'Campaign' drop down and select the desired Campaign.
5. Select the 'Save' button.
![]()