Managing Applicants
Contents
[hide]- 1 Managing Applicants who have submitted applications for a vacancy
- 1.1 Submitted Applications
- 1.1.1 Viewing the Applicants Details and Resume
- 1.1.2 Viewing the Applicants Score
- 1.1.3 Recording an Interaction with the Applicant
- 1.1.4 Viewing the Interaction Log History
- 1.1.5 Exporting the Applicant Summary
- 1.1.6 Progressing the Applicant through the Recruitment process steps
- 1.1.7 Marking the Applicant as Unsuccessful or Withdrawn
- 1.1.8 Hiring the Applicant
- 1.1 Submitted Applications
Managing Applicants who have submitted applications for a vacancy
Ad
- After logging into the Subscribe-HR portal, select the Recruitment TAB.
- Select the Vacancies Folder.
- Select the desired vacancy to manage.
- Select the Manage sub-folder.
We should see various TABS across the page. The amount of TABS will depend on how many steps in the workflow process that was allocated to the vacancy.
Submitted Applications
When an application is submitted from the Online Portal or Intranet the applicants details will appear in the first step of the Stepping Tool.

From the Stepping Tool you can:
- View Applicants details.
- View the Applicants Score.
- Log any interaction with the applicant.
- View a log of interaction history.
- Export an Applicant Summary.
- Progress the Applicant through the next steps of the Recruitment Process.
- Mark the Applicant as Unsuccessful or Withdrawn.
- Hire the Applicant Now.
Viewing the Applicants Details and Resume
To view the applicants details select the applicants name. The applicants name should appear as a link. This will direct you to the applicant details screen.
To quickly get back to the Stepping Tool select the << Back To Vacancy Management link at the top of the screen.

Viewing the Applicants Score
Scores can be placed on General Questions, Certificates and Licences, Education & Qualifications and depending on how the applicant answers these questions, or if the applicant has a particular Certificate or Licence they will receive points.
To view the applicants score breakdown select the score value. The score value should appear as a link. This will direct you to the Score Summary TAB.
To quickly get back to the Stepping Tool select the << Back To Vacancy Management link at the top of the screen.
Recording an Interaction with the Applicant
To record an interaction with the applicant select the Contact link. This will direct you to the Contact Interaction page.
- Select the Contact Date. from the date picker.
- Select the Contact Type.
- Enter any comments.
- Select the Save button.
To quickly get back to the Stepping Tool select the << Back To Vacancy Management link at the top of the screen.
Viewing the Interaction Log History
To view the interaction log for the applicant select the View History link. This will direct you to the Contact Summary TAB.
To quickly get back to the Stepping Tool select the << Back To Vacancy Management link at the top of the screen.
Exporting the Applicant Summary
The export of the applicant summary produces a PDF file of the applicants particulars, Education & Qualifications, Work History, Referees and a Profile Score.
To export a summary select the 'Export Summary link. This will generate a PDF and start a download for you.
Progressing the Applicant through the Recruitment process steps
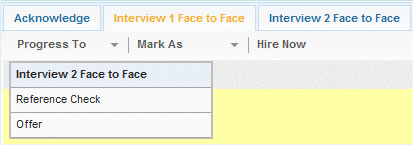
The Recruitment process steps are shown as TABS across the screen. Each TAB is one step in the process. The steps in the process may vary per vacancy if using different workflow processes.
- Select the step in the process where you want to move the applicant FROM
- Select the check box next to the applicant you wish to step through.
- Select the Progress To drop down.
- Select the step in the process where you wish to move the applicant TO
Please note depending on how your Recruitment Workflows are setup the applicant maybe receiving automated correspondance advising them that they have moved in the recruitment process.
Marking the Applicant as Unsuccessful or Withdrawn
Marking the applicant as unsuccessful or withdrawn can happen at any stage in the recruitment process.
To mark the applicant as Withdrawn
- Select the check box next to the Applicant
- Select the Mark As drop down
- Select Withdrawn
- The Applicant record will appear with a line through and greyed out. The links still remain active.

To mark the applicant as Unsuccessful
- Select the check box next to the Applicant
- Select the Mark As drop down
- Select Unsuccessful
- You will be prompted to enter a reason
- Select the reason from the Reason drop down.
- Enter any comments.
- Select the Ok button.
- The Applicant record will appear with a line through and greyed out. The links still remain active.

Hiring the Applicant
To Hire the applicant now
- Select the check box next to the Applicant
- Select the Hire Now link
- You will be directed to the New Employee Wizard. However there are a lot less fields as the applicants particulars have been already filled out for you.
If the applicant is an Internal Applicant you will be directed to the Job page. - Select the Start Date using the date picker.
- Select the Job Name from the drop down.
- Enter the Employee Salary.
- Enter the Hourly Rate if applicable.
- Select the Salary Type from the drop down.
- Select the Payment Frequency from the drop down.
- Enter the Actual Hours.
- Select the Save button.