Managing Leave
Contents
[hide]Managing Leave with the Employee Leave Wizard
Managing Employee Leave could not be simpler. Featuring a single interface for Annual Leave, Sick Leave, Maternity/Paternity Leave, LSL and more.
Pre-requisite's
- Ensure the Global Leave Configuration is setup
- Create Leave Profiles
- Ensure a Leave Profile is assigned to the Employee
Global Leave Settings
The Global Leave Settings has to be setup once.
- After logging into the Subscribe-HR portal, select the Settings Link.
- Select the Leave Accrual Units.
If this appears as text and not editable, then the Accrual Units have already been set. - Select the Leave Transaction Profile.
The options are Auto Calculated, Auto Calculated (No Balances), Manual Entry.
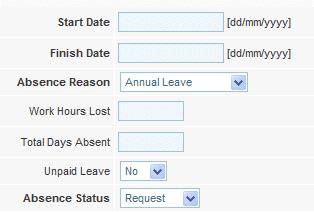
Auto-Calculated enables the system to calculate the Days Absent and Work Hours Lost via the Working Hours definitions when an Absence is entered.
Manual Entry allows the user to specify the Work Hours Lost and the Total Days Absent.
- Select the Save button.
- Select the Accrual Country Settings. Select the Country the system is used in. It is important that the correct Country is selected as this will impact on how Leave is Accrued.
- Select the Leave Period Date Type.
Company Date causes the system to Accrue Leave based on a defined date and this date becomes the Anniversary Date for Leave Accruals.
Anniversary Date causes the system to Accrue Leave based on the Employee start date. The Employee Start date is the Anniversary Date for Leave Accruals for the particular employee.
- Set the Company Leave Anniversary Date. This only becomes valid and active if Leave Period Date Type is set to Company Date.
- Select the Save button.
Leave Settings / Leave Profiles
Leave Settings is where the Leave Profiles are created. There is no limit on the amount of leave profiles that can be created.
The benefits of Leave Profiles is seen when you have such scenarios as:
Management, or particular employees accruing Annual or Sick Leave Days at a higher rate than other employees.
Example:

Creating a Leave Profile
- After logging into the Subscribe-HR portal, select the Maintenance TAB.
- Select the Leave Settings folder.
- Select the create button.
- Enter the Leave Profile Name. Ensure the name is descriptive.
- Select the Leave Type.
- Enter the Total Annual Amount that is accrued.
The unit amount can be found in the Annual Amount Units field. Example: If the Annual Amount Units is Days and Total Annual Amount is 20 then the Total Annual Amount would be 20 Days per year - Select the Leave Accrual Interval. This is the period between accruals. Example: Monthly would cause the system to calculate new Leave Accrual transactions on the Anniversary day of the Month.
- Enter Leave Exclusion Period.in months. The leave exclusion period is the amount of time from the Leave Profile Start Date that the Employee will not accrue leave. Example: If an Employee Starts work on the 01/03/yyyy, the Leave Profile Start Date is 01/03/yyyy, and Leave Exclusion Period is 6 months, the Employee will start accruing Leave from the 01/09/yyyy.
- Check the Carry Forward option if this accrual is not reset and the amount accrued the year before is carried over to the following year.
Example: Annual Leave may have the Carry Forward option selected, while Sick Leave may not have the Carry Forward option selected. - Select the Save button.
Assigning Leave Profiles to an Employee
After Leave Profiles have been setup we will have to assign Leave Profiles to each employee.
- After logging into the Subscribe-HR portal, select the Human Resources TAB.
- Select the Employee Folder.
- Select the desired employee.
- Select the Leave Profiles sub-folder.
- Select the create button.
- Select the Profile Name from the drop down.
- Select the Profile Start Date from the date picker.
- Enter Already Accrued Amount. This is often used if you are transitioning from an old system, where the employee may have had already accrued amounts.
- Select the Save button.
Note: These steps may have to be repeated to create additional leave profiles.

Creating Leave Transactions for Employees
There are multiple of ways that Leave transactions can be created.
- Recorded Absence on the Employee File
- Employee Request for Absence
We will look at both:
Recording an Absence on the Employee File
- After logging into the Subscribe-HR portal, select the Human Resources TAB.
- Select the Employee folder.
- Select the desired employee.
- Select the Absence sub-folder.
- Select the create button.
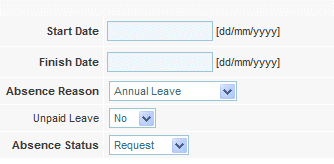
- Select the Start Date of Absence.
- Select the Finish Date (return date) from Absence.
- Select the Absence Reason Selecting Annual Leave or Sick Leave will deduct the appropriate amount.
- Select the Unpaid Leave option if this leave is to not deduct any amounts.
- Select the Absence Status.
- Select the Save button.
Note: Any attachments will be able to be added after the Absence record has been saved.
Employee Request for Absence
- After the Employee logs into the Self Service module of Subscribe-HR, the employee can select Request Leave from the Dashboard

- The employee is directed to the Request Leave screen

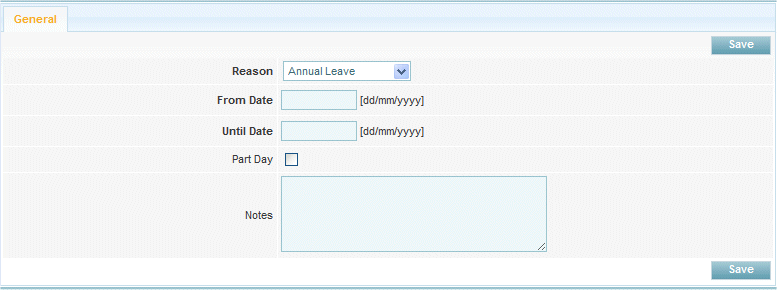
- Select the Reason for leave.
- Select the From Date using the date picker.
- Select the Until Date using the date picker.
- Select the Part Day check box if it is a request to leave for part of the day.
- Enter any notes regarding the leave request.
- Select the Save button.
Note: After the employee has requested leave, the leave record is created in the Employees Absence folder, and the manager notified of the request.
Viewing the Leave Balances screen
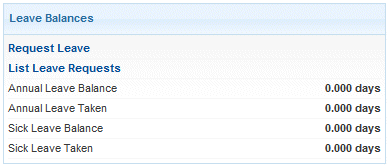
The Leave balance screen is an always current balance sheet for the employee. You will be able to see the Total balance available for each type of Leave.
Note: Leave Balances are first calculated on the first day of the accrual cycle. It is not unusual to see an empty Leave Balances sheet if the accrual cycle has not occurred yet.
- After logging into the Subscribe-HR portal, select the Human Resources TAB.
- Select the Employee folder
- Select the desired employee
- Select the Leave Balances sub-folder
Viewing the Leave Transactions screen
The Leave transactions screen is a running total of all accruals that occur for each defined period.
You will see the Transaction Date, the 'Leave Amount, The Transaction Type and Leave Type
Note: Leave Transactions occur on the first day of the accrual cycle. It is not unusual to see an empty Leave Transactions sheet if the accrual cycle has not occurred yet.
- After logging into the Subscribe-HR portal, select the Human Resources TAB.
- Select the Employee folder.
- Select the desired employee.
- Select the Leave Transactions sub-folder.