Defining Workflows
(Created page with '{{page.name: Development Module: Defining Workflows for Objects and Workflow Types - Subscribe-HR Wiki}} {{page.head: Defining Workflows}} __TOC__ ==What is a Workflow== A work…') |
(No difference)
|
Revision as of 05:15, 28 April 2010
Contents
[hide]What is a Workflow
A workflow consists of a sequence of connected steps. It is a depiction of a sequence of operations, declared as work of a person, a group of persons, an organization of staff, or one or more simple or complex mechanisms.
Workflows are triggered by meeting a condition, or reaching a step defined in the workflow process.
Defining Workflows for Objects
We first of all need to select the Object we wish to create the workflow for. Our choice of the object will be based on the information we are collecting.
Workflow Types
Workflow types define when an action should be triggered. The Workflow types are:
- Create New Records - Workflow is triggered when a new record is created
- Update Existing Records - Workflow is triggered when an existing record has been updated
- Create New or Update Existing Records - Workflow is triggered when a new record or an existing record has been updated
- Time Based - Workflow is triggered when a time condition has been met.
Examples
An Example of a Time Based Workfow Type: Employee Birthdate
We could setup an Employee Birthdate workflow with the conditions of where the Employee birthday is less than 3 days. When the condition of 3 days before the Employee Birthday is met an action is triggered.
An Example of a Create New or Update Existing Records Workflow Type: Employee Address Update Notification.
When an employees address details are updated or a new record inserted, a notification can be automated.
Creating a Workflow for an Object
- After logging into the Subscribe-HR portal, select the Development TAB
- Select the Objects folder.
- Select the Object that you wish to define a workflow for.
- Select the Workflow Tasks sub-folder.
- Select the create button.
- Decide whether the Workflow is Active or not
If this is set to Yes then the Workflow is active in the system, and when triggered the workflow will carry out its task. - Enter the name of the workflow you are creating.
- Select the Workflow type as defined above.
- Select the Workflow mode
Standard Workflow Mode should be used for most Workflows created where the conditions inside the workflow are adequate.
The Custom Condition Workflow Mode option is available as some areas of the system have pre-programmed custom conditions that cannot be otherwise defined by the Standard Workflow Mode, if selecting the custom condition you loose the ability to define your own conditions. - Select the Save button.
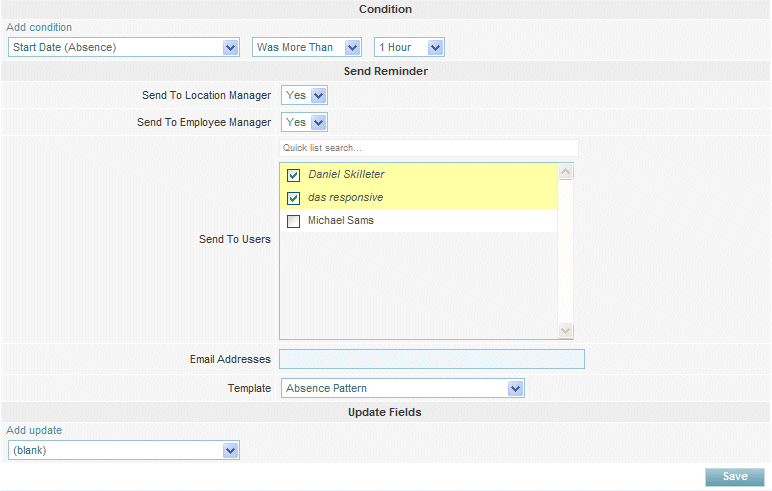
After the record has been saved the conditions section is shown.
Mandatory fields are marked in bold, the record will not be saved unless mandatory fields are filled in first. - From the drop down under Add condition select the field that you want to trigger the workflow on.
- Select the condition that applies to the selected field.
Additional conditions can be added by selecting the Add condition link. - Select if a Reminder should be sent to the Location Manager.
- Select if a Reminder should be sent to the Employee Manager.
- Select if a Reminder should be sent to any particular users of the system.
- Enter any other email addresses that you with the reminder to be sent to.
- Select the Template that will be used in the sent email.
- Select the field you wish to update as a result of this workflow being triggered.
This is not necessary to be filled out if you only want a reminder to be sent out, however if you did want to automate and update a field with a particular value this can be done by selecting the field to update and selecting or entering the value that should be updated into the selected field.
To update additional fields select the Add update link. - Select the Save button.