Security Permissions
| Line 23: | Line 23: | ||
# You should see a Core Modules column and an Allow Access column. | # You should see a Core Modules column and an Allow Access column. | ||
# A tick in the Allow Access column adjacent to a Core Module means that this Security Group has access to these features in the system. | # A tick in the Allow Access column adjacent to a Core Module means that this Security Group has access to these features in the system. | ||
| − | # Select one of the Core Modules.<br>[[File: | + | # Select one of the Core Modules.<br>[[File:Edit_Permssions_1.png]] |
# You should see a table with the folders down the page and allowable permissions across the page.<br>[[File:perm_matrix.gif]] | # You should see a table with the folders down the page and allowable permissions across the page.<br>[[File:perm_matrix.gif]] | ||
# If you wish to change the access on an entire folder simply check or remove the check in the appropriate column adjacent to the folder. <br><br>Example: Removing a check from the Delete column adjacent to the Employee folder will cause any user that has this Security Group singularly assigned to not be able to delete Employee's.<br><br>If you wish to change the access at a page level, (allow or remove access to someone Viewing or Editing a field) select the folder and this will drill you down to the next level.<br>[[File:field_level.gif]] | # If you wish to change the access on an entire folder simply check or remove the check in the appropriate column adjacent to the folder. <br><br>Example: Removing a check from the Delete column adjacent to the Employee folder will cause any user that has this Security Group singularly assigned to not be able to delete Employee's.<br><br>If you wish to change the access at a page level, (allow or remove access to someone Viewing or Editing a field) select the folder and this will drill you down to the next level.<br>[[File:field_level.gif]] | ||
Revision as of 01:50, 25 January 2012
Contents
[hide]Security Groups
Subscribe-HR comes with 11 Security Groups already defined to get you started.
It is advisable to use and tweak the existing Security Groups.
When logging into the system to perform Security Permission changes,
It is important to login with access to the correct permissions to the Maintenance and Groups areas of the system. This is usually the HR Administrator or System Administrator.
If you cannot see the Maintenance TAB or the Groups menu item you may not have the correct permissions to perform Security Group changes.
Locating and Editing Security Groups
- After logging into the Subscribe-HR portal, select the Maintenance TAB.
- Select the 'Groups' Folder.
- You should see a list of Group Names. These are the existing Security Groups.
- Select the 'Edit Permissions' hyperlink adjacent to Security Group you wish to modify.

- You should see a Core Modules column and an Allow Access column.
- A tick in the Allow Access column adjacent to a Core Module means that this Security Group has access to these features in the system.
- Select one of the Core Modules.

- You should see a table with the folders down the page and allowable permissions across the page.

- If you wish to change the access on an entire folder simply check or remove the check in the appropriate column adjacent to the folder.
Example: Removing a check from the Delete column adjacent to the Employee folder will cause any user that has this Security Group singularly assigned to not be able to delete Employee's.
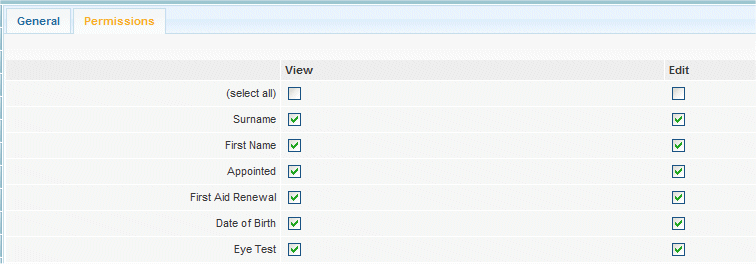
If you wish to change the access at a page level, (allow or remove access to someone Viewing or Editing a field) select the folder and this will drill you down to the next level.
- If you are making modifications to the Folder level ensure you select the 'Save' button before drilling to a deeper level.
What Security Groups are assigned to a particular user
- Select the Maintenance TAB.
- Select the Users Folder.
- Select the user.
- Locate the Security Group options box, any checks in this options box mean that this user has the selected Security Group assigned to them.
Security Groups Explained
All users are assigned to one or more Security Groups. Security Groups define
the users permissions within the system (this is what data the user can see and what functions and access the user has over changing the data).
User permissions can be set for Create, Update, Delete, Archive, Import, Export and View.
In the below example we can see that if this Security Group is assigned to the user then the user would be able to
Create, Update, Delete and View the Employee Record and Employee Training Records, However will ONLY be able to View Employee Medical information.
Multiple Security Groups Assigned to a User
When multiple Security Groups are assigned to a user the security permissions of each Security Group are merged together.
If you can imagine 2x Overhead Projector sheets, One sheet with 3x ticks on it and the second sheet with 2x ticks on it,
When you place these two sheets together you end up with 5x ticks visible.
Example: Security Group A as above allows for the user to be able to
Create, Update, Delete and View the Employee Record and Employee Training Records, and ONLY be able to View Employee Medical information.
If we now assign Security Group B to the same user, and Security Group B allows the user to Create, Update and Delete the Employee Medical information,
We suddenly have an effect of the user being able to Create, Update, Delete and View the Employee Record and Employee Training Records, and Employee Medical information.
Group Filtering
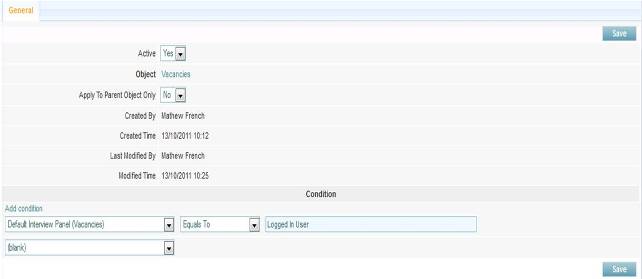
Group Filtering can be set-up to allow specific users to interact with areas of the system according to specific filters, which interact with their overall Security Group. For example, You can set-up a Filter that applies to an an Interview Panel which has been assigned to a Vacancy. So that any of the Interview Panel, can view the Applicants for that Particular Vacancy.
- Select the "Groups" Folder in "Maintenance"
- Select a Specific Group
- Select the "Filtering" Sub Folder
- Click "Create"
- Mark "Active" as "Yes"
- Select the "Object" that the Filter Applies to. In the Example above this will be the "Vacancies" Object
- Click "Save"
- Then you will have access to the "Conditions" that can be set-up
- Select "Condition" "Default Interview Panel (Vacancies)" - "Equals To" - "Logged In User".
- Click "Save"

